A Complete Guide to Publishing a Google Workspace Add-on (Google App Script Tutorial)
If you're looking to publish an add-on to the Google Workspace Marketplace (GWM), whether you are creating an app for Google Sheets or Google Docs or anything in between, then this step-by-step post is for you. The first add-on I published to the marketplace took a lot of navigating. The team and I faced a lot of head scratching as the process wasn't as straight forward as anticipated. There is some documentation online but it's scattered, and the platforms that we had to interact with like the Google Cloud Platform (GCP) were confusing. So if you're facing similar issues or just want to preview what the process is like, read on.
This tutorial will go through Google App Script (GAS) add-ons, and I'll be using Google Sheets as an example. Add-ons for other Google Workspace products will have a similar process but you will need to apply these concepts to those products. I'll walk through everything from setting up a project on GCP to interacting with the Google Workspace add-on review team to get the app approved and published. Just a heads up, this is a lengthy process. Let's get started.
1. Review your app to be compliant with Google's guidelines
At this point, I'm going to assume your app is more or less complete and is at a stage where you want publish. The first step to that process is to review your app to make sure it meets and satisfies Google's design content and general guidelines. Follow Google's official GWM guidelines here to check off everything related to your app.
This includes things like making sure all the links work correctly, there are no obvious bugs, the add-on doesn't use Google brand assets, etc.
2. Create a standard Google Cloud Platform project
Every GWM add-on needs to be connected to a GCP project. There is a unique project ID that needs to correspond to the add-on. Follow these steps:
2.1. Log on to your Google Cloud Console and create a new project.
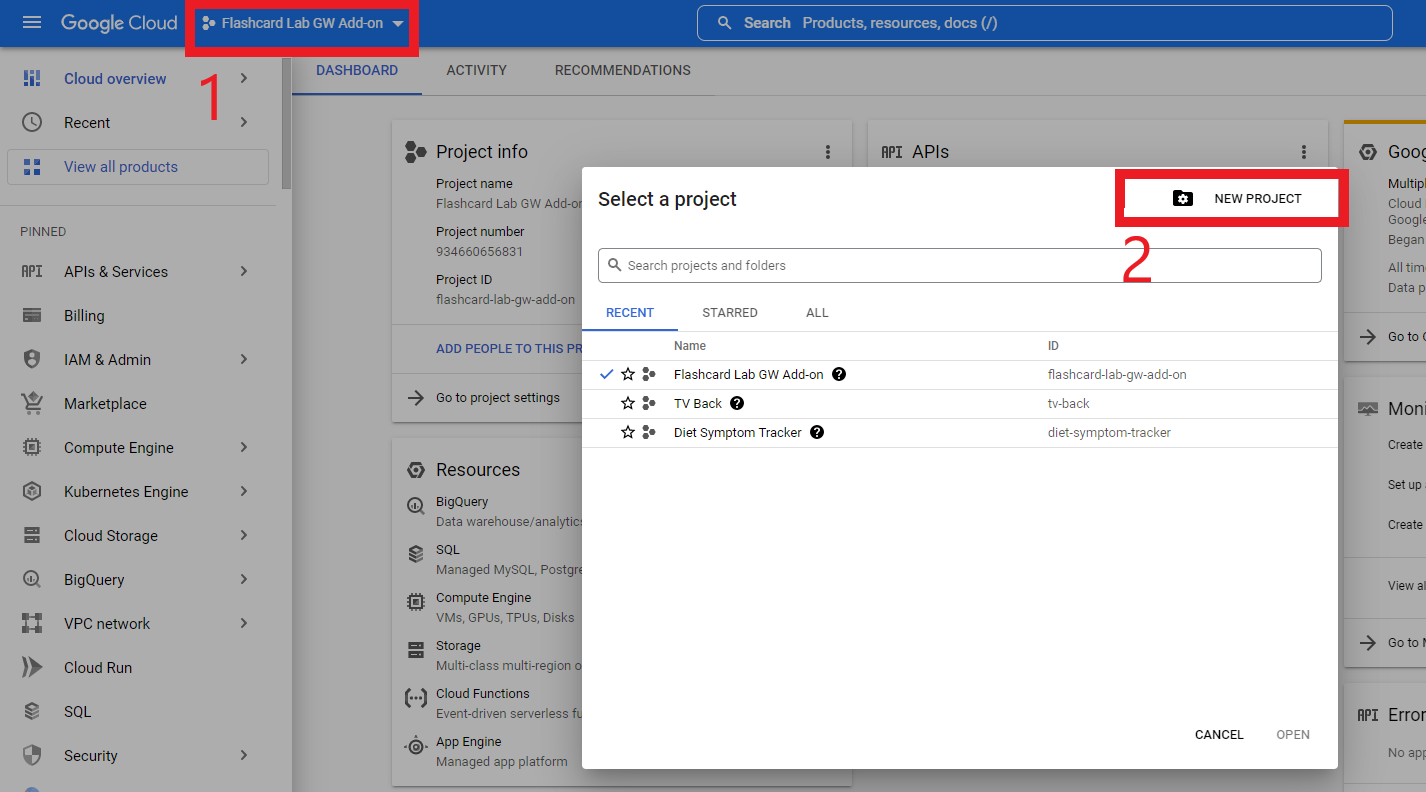
2.2. Fill in the project name and put it in a directory of your choosing. Then, click "Create".

For a reference, see this article: https://developers.google.com/apps-script/add-ons/how-tos/publish-add-on-overview.
3. Set up the Oauth consent screen
If your add-on is to work with Google's products, then the user will need to authorize your app to allow certain functionality with their account and files. This is what the Oauth consent screen is for. It allows the user to understand what access your add-on is asking for. You need to accurately list them to be able to publish your add-on. Follow these steps to properly set up your consent screen:
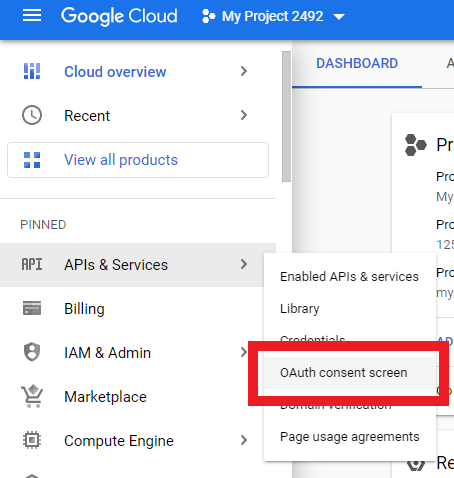
3.1. On your GCP project overview page, click on "APIs and Services" and then "Oauth consent screen".
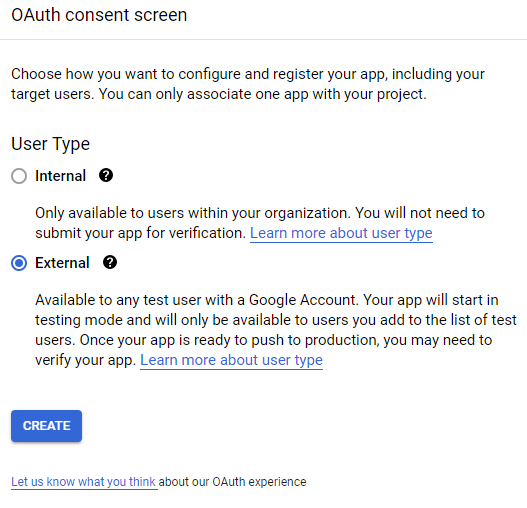
3.2. It's going to ask if you want your app to configured as external or internal. If you what it to be public, click "External" and then click "Create".
3.3. This will bring you to a 4 step process to fill out information about your app. The first page is just general app information like the name, the URL of your homepage, etc. This is pretty self-explanatory.
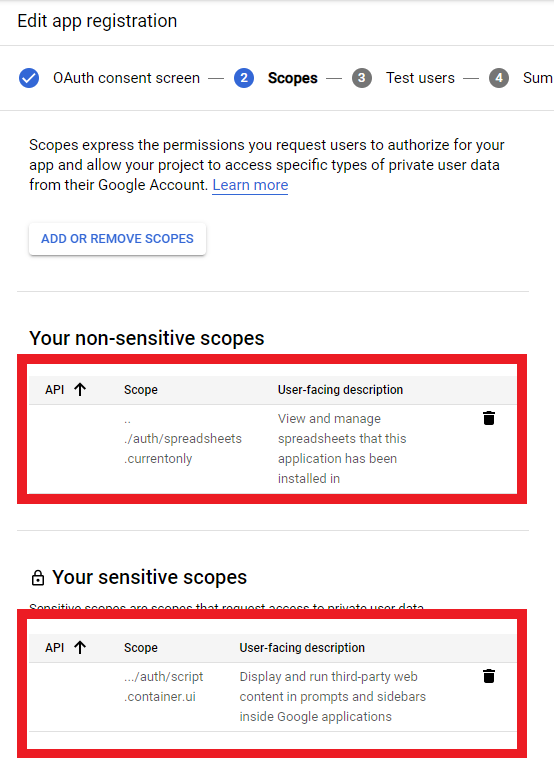
3.4. The 2nd page is the important one. This is where you need to fill out the scopes that your add-on uses. Scopes are just the permissions that the user will grant your app. If you are working with Google App Script, make sure these are consist with the appsscript.json file. The scopes will look something like this:
For more information on scopes, read this article: https://developers.google.com/apps-script/concepts/scopes
3.5. On the 3rd page, add any users that will test your app. These are just testers that have a Google account, and you can add their emails here. This will be important if you intend on testing a production version of the add-on using a test deployment.
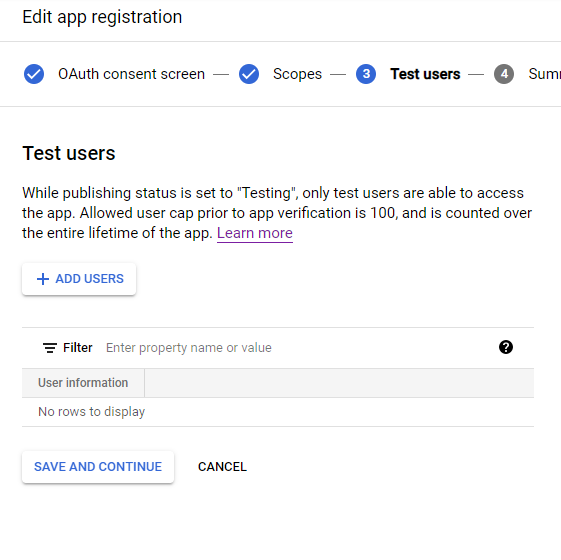
3.6. The last page is just a summary page to make sure all the information is correct. If it is, you can click "Back to Dashboard". If you ever need to edit the Oauth consent page, just click "Edit App".
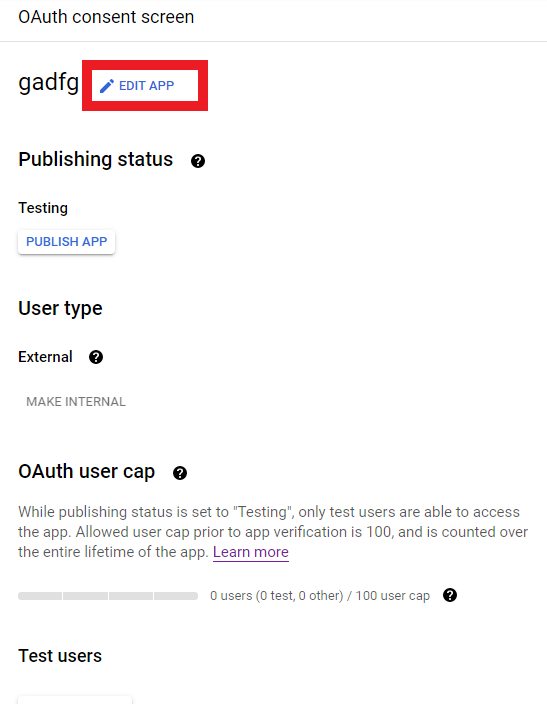
At this point, don't click "Publish App" yet. Even if you click this, it doesn't actually publish your app to the marketplace. It just sends your Oauth consent for review. Hold tight.
For extra reference, read this article: https://developers.google.com/apps-script/guides/cloud-platform-projects#completing_the_oauth_consent_screen.
4. Create a Google App Script project & Deploy your app
You can think of creating and setting up the GCP project and the Oauth consent screen as the business-y, logistics-y backend of this process. Now, you need to be able to connect that business backend (not to be confused with your servers' backend) with your actual app. To do this, follow these steps:
4.1. Navigate to your Google App Script homepage and click "New Project".

4.2. Now, upload your add-on's code and files to this new GAS project. You can do this in whatever way you like. I create my add-ons based off of this repo: https://github.com/enuchi/React-Google-Apps-Script so I would run my "npm run deploy" command to this newly made GAS project.
4.3. Link your GAS project with your GCP. To do this, all you have to do is find your project number on your GCP dashboard. It looks like this:
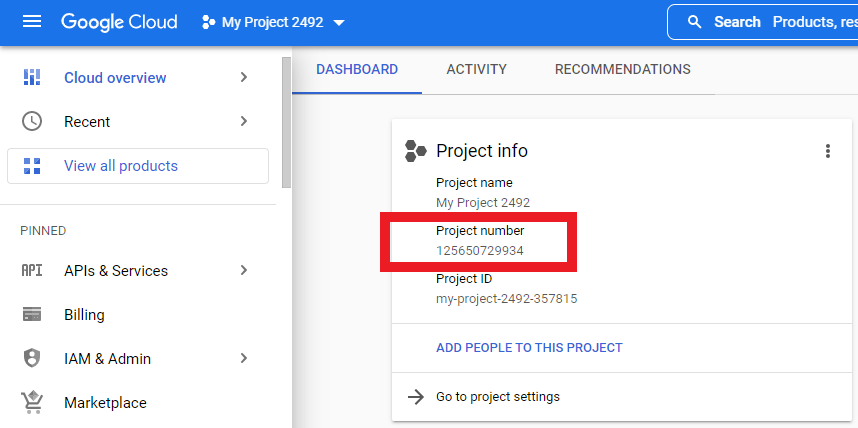
Copy and paste that number into your project settings on your GAS project page and click "Set Project":
4.4. Finally, create a new deployment for your add-on in GAS. Click the "Deploy" dropdown menu at the top right, click "New Deployment" and then proceed in the pop up modal.
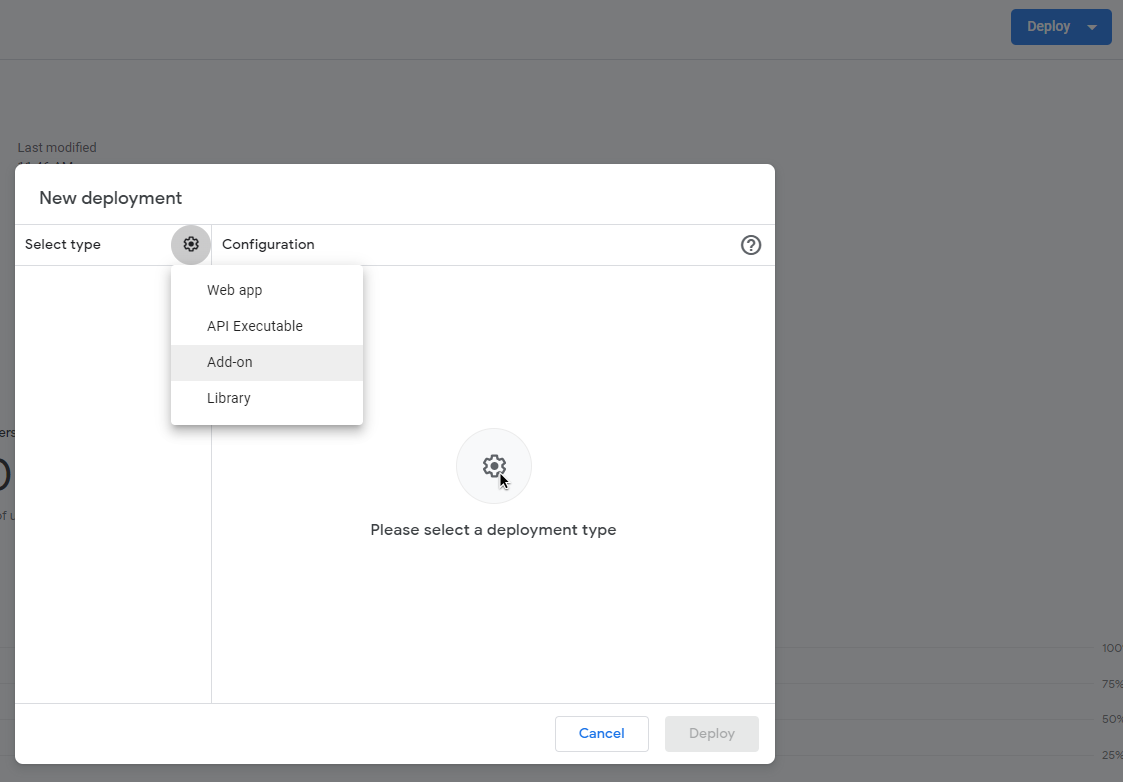
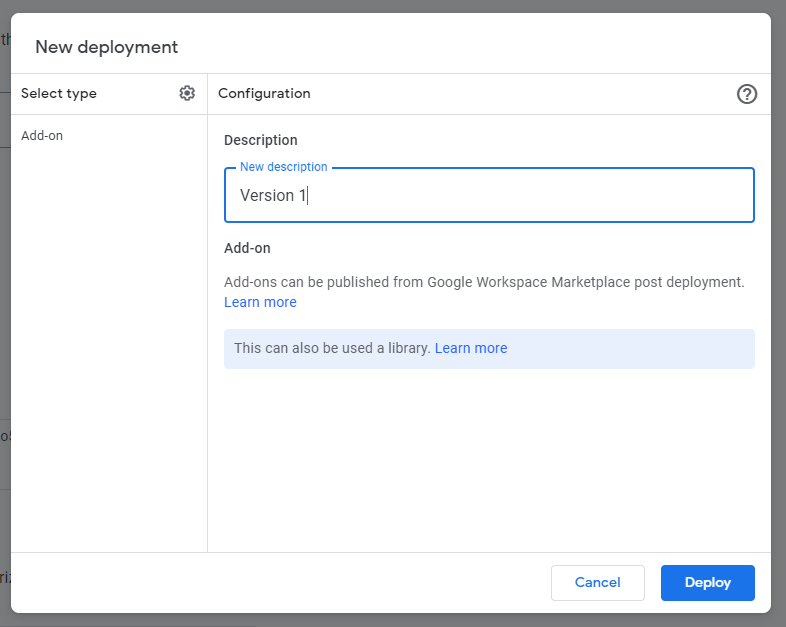
For a Google Sheets or Docs add-on, etc., select "Add-on". There are also options for web apps, API executable and so on. Pick whatever is suitable for your add-on and proceed. Next, you will be asked to give a description for your deployment. Name it whatever you like and click "Deploy".
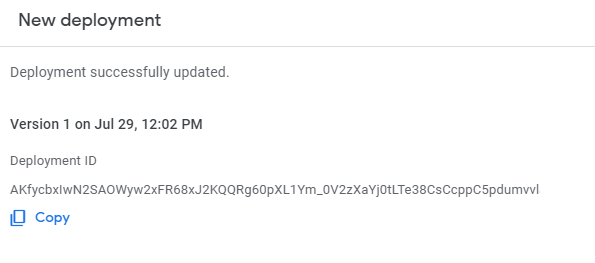
4.5. Once you deploy your add-on, a pop up will show with the version number of this deployment. This is important so make a reference of that.
For more reference on GAS, take a look at this article: https://developers.google.com/apps-script/guides/
5. Enable Google Workspace Marketplace SDK
In this step and the next, I'll be referencing steps 3 and 4 in this article: https://developers.google.com/workspace/marketplace/how-to-publish.
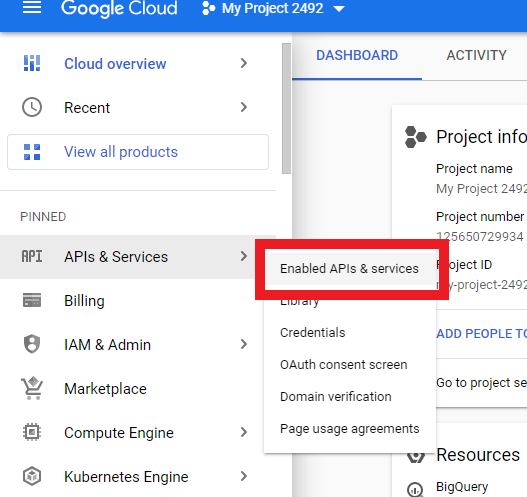
5.1. Go to your GCP dashboard, click "APIs & Services" and click "Enable APIs & Services".
5.2. Search for "Google Workspace Marketplace SDK" and click "Enable".

Enabling this SDK allows your app to be configured to be shown in the marketplace listings.
6. Create a store listing
Once the GWM SDK has been enabled, you will see something like this where there are tabs to fill out information about your add-on.
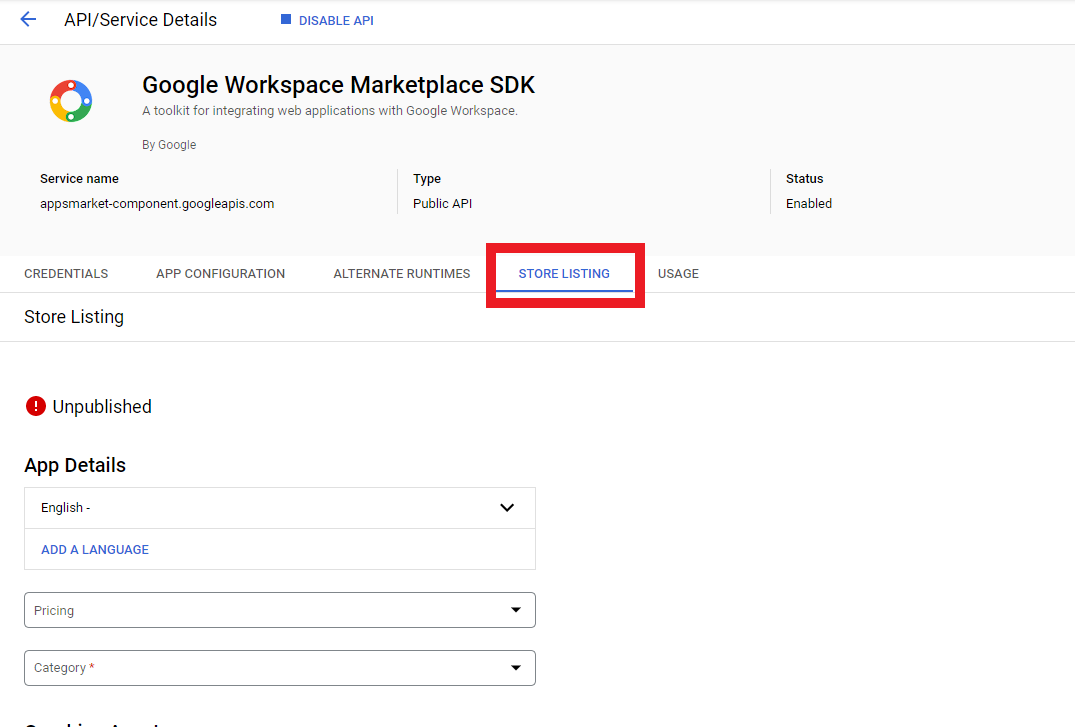
To continue, follow these steps:
6.1. Fill out all the necessary information in the "Store Listing" tab. This includes your app name, short and long descriptions, any logos or icons, privacy policy and support links to your website, etc. Once you're done, click "Save" but again, don't click "Publish".
6.2. Then, click on the "App Configuration" tab. The "App Visibility" and "Installation Settings" should be set to their default settings like so:

For the "App Integration" section, check the Google products that your add-on is designed to work with. For this example, mine only works with Google Sheets so I will check that and then enter the project script ID and the version number in these fields:
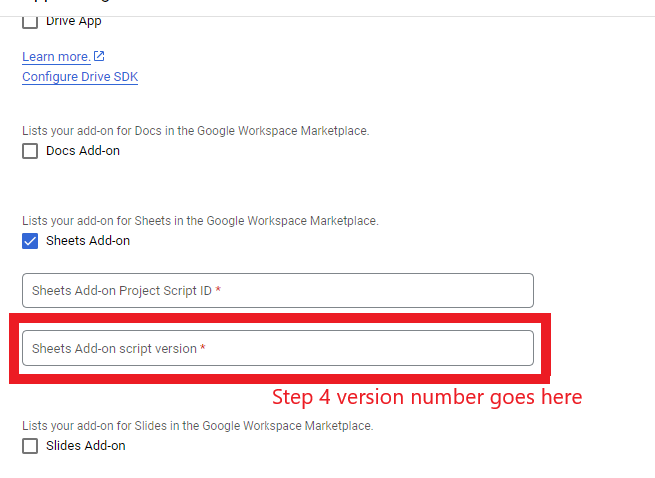
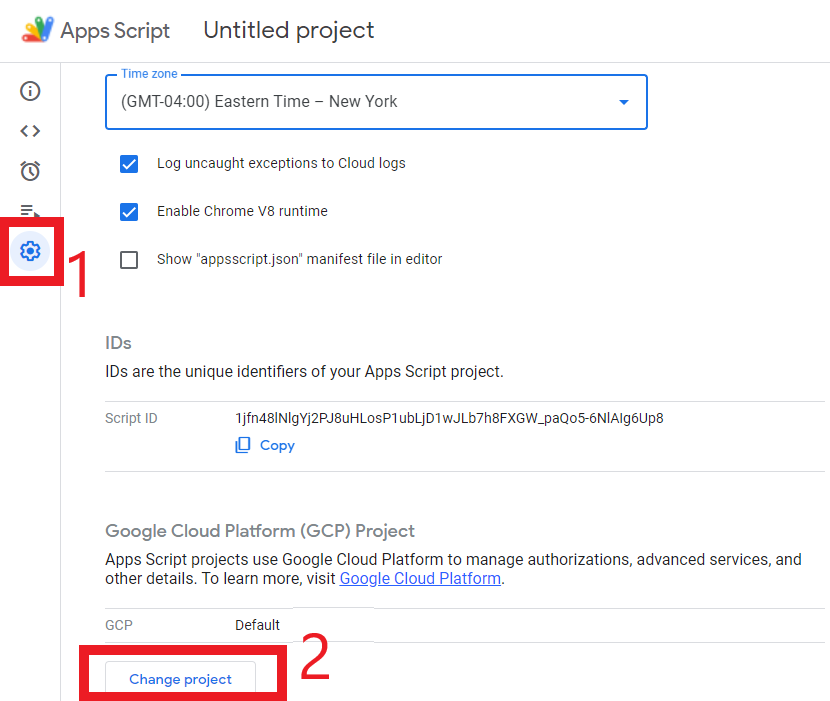
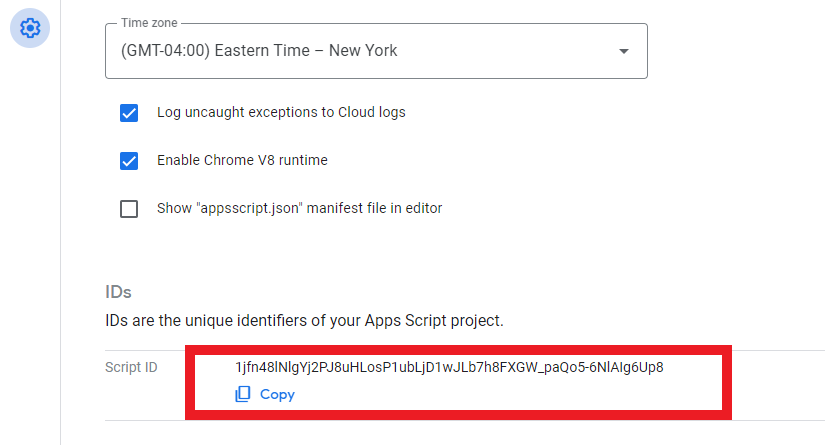
The project script ID is found in the GAS project settings page.
The version number is found from your GAS deployment at step 4.
6.3. Make sure your Oauth scopes are correct. They should be prepopulated and consistent with the ones you set in the Oauth consent screen.
6.4. Fill in the rest of the information and click "Save".
7. Publish Oauth consent screen for review
Phew, it's been a long process but it's definitely not finished yet. At this point, you can go to the Oauth consent screen page in your Google Cloud Platform project and click "Publish App". The verification status will show that it's in progress now.
What's happening here though, is that your scopes will be sent to the Trust and Safety review team to look over. Your app is not yet ready to be published onto the marketplace until this has been approved. The team will communicate with you via email. After you click "Publish App", here are some of the things you will have to do (not limited to this though).
1. Fill out fields answering why those scopes are needed in your add-on.
2. If you haven't, you need to verify your domain on the Google Search Console. This is to make sure the website you put down for your privacy policy, support pages, etc. is actually controlled by you.
3. You need to make a video showing that the Oauth consent screen and its scopes, are associated with your GCP project ID. Then, you need to upload it to YouTube and share it with the review team. This is a process in itself but it's not too bad if you know where to start. I'll break it down in this next section.
7.1 Making the Oauth consent screen video
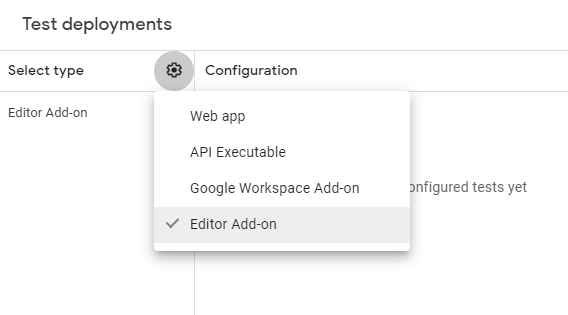
All you need to do is use a screen capture software like OBS and record yourself testing the add-on, having the consent screen pop up, and having the GCP project ID in the video. The best and easiest way to do this is to deploy a test from your GAS project. Here are the steps:
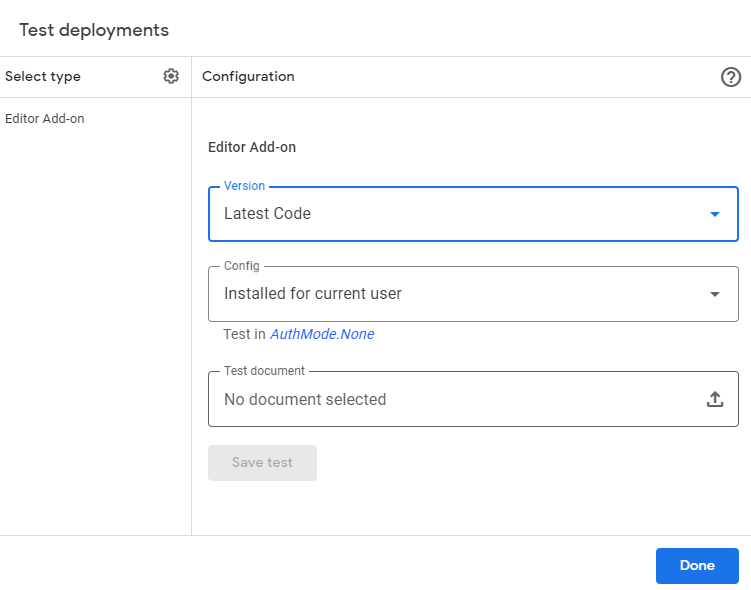
7.1.1. On your GAS project, click the "Deploy" dropdown at the top right. Then, click "Test deployments". A modal will pop up to ask which deployment type. You want to select what makes sense for you but for Google Sheets or Docs, select "Editor Add-on" NOT "Google Workspace Add-on".
7.1.2. Click "Create a new test".
7.1.3. Then, keep the default configuration and select a file in your Google Drive to test it on. Then, click "Save test". Remember this tutorial is specific for Google Sheets and Docs so you will need to select some dummy demo file from your Drive. For web apps or other applications/products, this may be different.
7.1.4. Once the test has been created, you want to execute it and start your screen recording.
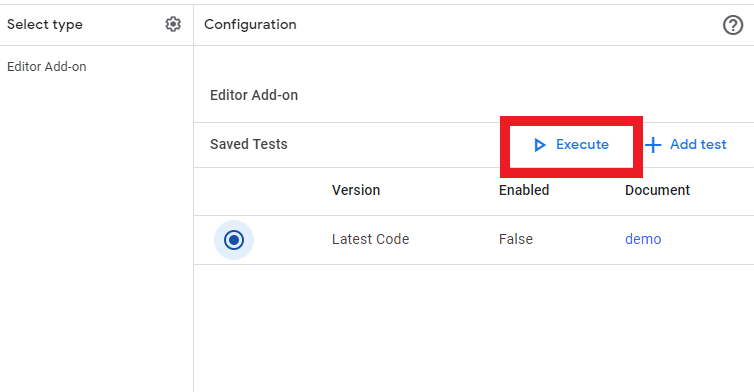
Then, try to use your add-on. Once any function of your add-on hits one of the scopes, the Oauth consent screen will pop up. Make sure the URL of that pop up is visible and you should be able to see your GCP project ID as a parameter in the URL. This is what the review team is looking for. Go ahead and accept the permissions and walk through your app a bit. Your video should look something like this:
8. Publish your store listing and app for review
Once your Oauth consent screen has been approved, this is the final step. However, there are still many things to consider. I'll go through them but first, follow these steps to start the publishing process:
8.1. Go back to your GCP project page and go to the Google Workspace Marketplace SDK page where the "Store Listing" tab is in step 6. Sometimes this is hard to find too but you just need to click on "Enable APIs & Services" and then in the list of APIs on the right, GWM SDK will be listed.
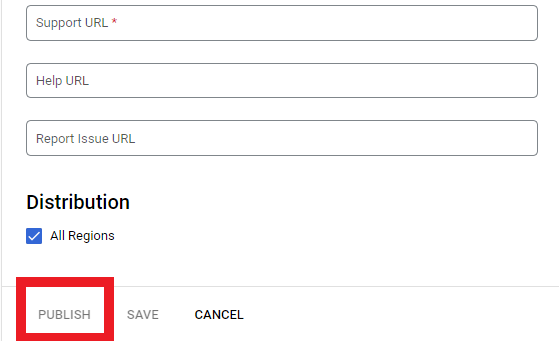
8.2. Click on "Store Listing" and scroll all the way down and click "Publish".
Congrats! You've now submitted your add-on to be published onto the Google Workspace Marketplace.
The process is still not over though. Now, a dedicated tester will review your app to make sure there are no glaring issues and that functionality is working fine. Again, they will work with you via email, and they will contact you for anything that you're not complaint with. In my experience, they're pretty responsive, and you can submit your add-on for re-review as many times as you want. They don't hold the number of times you submit against you.
Here are some things to look out for and some issues I ran into during this phase:
1. My privacy policy was not linked to my homepage. You need to have the privacy policy for your add-on be visible and accessible to users from your website's homepage. I think same thing goes for the the support page.
2. Certain logos were not consistent with my website and the add-on.
3. The absolute biggest issue I had was when the reviewer basically could not use the add-on. The side bar would just show the loading animation forever. This was NOT an issue on my part. My add-on was working fine in a production testing environment (like in step 7.1). This was due to an issue with add-ons not working in a browser where multiple Google accounts were signed in.
What happens is the add-on's scopes and functionality were authorized with the browser's default Google account BUT the reviewer was testing with an account other than the default one. So whenever the add-on needed access to one of the scopes, the account would deny it. This causes basically nothing to work.
To solve this, I communicated with the reviewer using a screen recording of me reproducing this issue and then solving it by logging out of all accounts and then logging back in with the default account. See this video for the solution.
This issue is not unique to me and is known by many add-on creators currently listed in the GWM. See this company's support page's first sentence. Essentially, this is a Google problem that's existed for years.
If you made it this far, I applaud you. I've spent so much time troubleshooting through this publication process and I think it can help others out there having the same issues. Though, this tutorial is kind of a bare minimum. There may be extra steps for publishing apps like web apps. I hope this guide has helped you. If it did, let me know on social media by messaging me on YouTube. Thanks.